Macros GUI integration
Along with the AncientGreek extension comes a library (also called AncientGreek) which provides some macros organized in modules. Not all macros are meant to be executed by the user, some of them are just helper functions for other functions. If you don't already know what they do, and why you should use them, please refer to the Macros page.
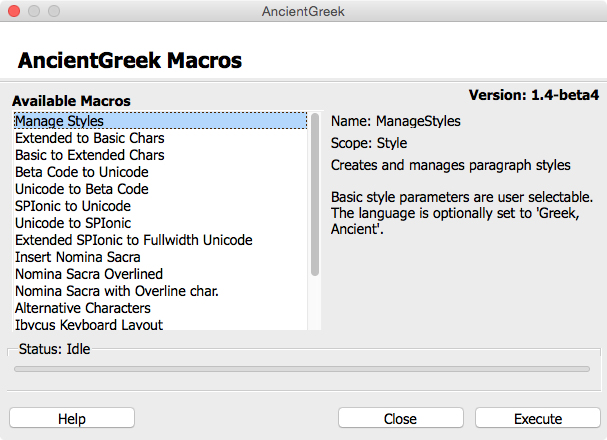
As of v. 1.2 all macros can be executed through the Ancient Greek Macros dialog shown below.

AncientGreek dialog on Mac OS
The dialog is made modeless, so that even if it's open it won't block acces to the document. This is particularly useful when selecting parts of the document to be used as input for a macro.
The user can use the arrow keys to select the macro to be executed, press ENTER to execute the selected macro or Close to close the dialog. There is also an option to get to the offline Help page, to get more info about the selected function.
The dialog can be opened either from the AncientGreek menu (introduced in v. 1.3-beta7), or from its own toolbar (red omega with circumflex icon).
AncientGreek Menu^
The following image shows a representation of AncientGreek Menu.

The main menu includes the following entries:
- The Help entry.
- This is a sub-menu which provides access to the offline help documents included in AncientGreek, or the online documentation.
- The Unlock Document entry.
- The execution of most of AncientGreek Macros takes a lot of time to complete. A way to reduce this time is locking the document (inhibiting document updates during macros execution). This means that any changes made to the document are not visible to the user until the document is unlocked.
- There is a disadvantage though; if anything happens and the macro crashes (terminates abnormally with due to errors) before the unlock command is executed, the document will remain locked until closed and reopened.
- Although I try hard to eliminate the possibility of macros crashing on you, this is not always the case. So, I have included this menu entry so that in case a user ends up with a locked document, he can easily unlock it and resume working.
- The unlock command can be consecutively executed until the document is unlocked.
- The Uninstall Preparation entry.
- Performs actions necessary to be taken before uninstalling AncientGreek. The use of this entry is mandatory in case AncientGreek has to be uninstalled.
- The About entry.
- Displays information about AncientGreek.
AncientGreek on the context menu^
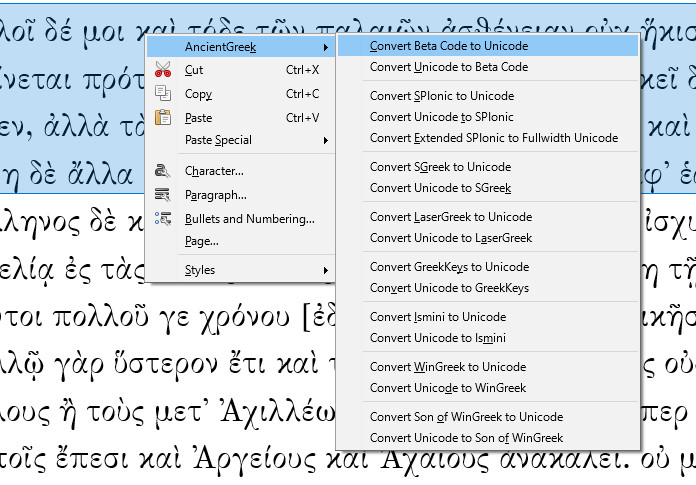
Version 1.5 introduces AncientGreek context menu integration, thus improving user experience. The AncientGreek submenu (shown in the following image) currently contains all available legacy conversions.

AncientGreek context menu (Windows 8)
AncientGreek Secondary Toolbar^
As of v. 1.3-beta7 a secondary toolbar has been introduced in order to provide quick access to individual AncientGreek macros. Currently, it provides access to the following macros:
 |
Styles Management |
 |
Styles Conversion |
 |
Ancient Greek text detection |
 |
Alternative Characters Conversion |
 |
Half/Fullwidth characters |
 |
Convert Beta Code to Unicode |
 |
Convert Unicode to Beta Code |
 |
Convert SPIonic to Unicode |
 |
Convert Unicode to SPIonic |
 |
Extended SPIonic to Fullwidth Unicode |
 |
Convert Sgreek to Unicode |
 |
Convert Unicode to Sgreek |
 |
Convert LaserGreek to Unicode |
 |
Convert Unicode to LaserGreek |
 |
Convert GreekKeys to Unicode |
 |
Convert Unicode to GreekKeys |
 |
Convert Ismini to Unicode |
 |
Convert Unicode to Ismini |
 |
Convert WinGreek to Unicode |
 |
Convert Unicode to WinGreek |
 |
Convert Son of WinGreek to Unicode |
 |
Convert Unicode to Son of WinGreek |
Showing / hiding the toolbar^
Normally a toolbar would be toggled on and off from the View / Toolbars menu; this is actually the way to hide AncientGreek main toolbar. Unfortunately, this is not that easy to do with the Secondary Toolbar, because of the random name it gets at installation time.
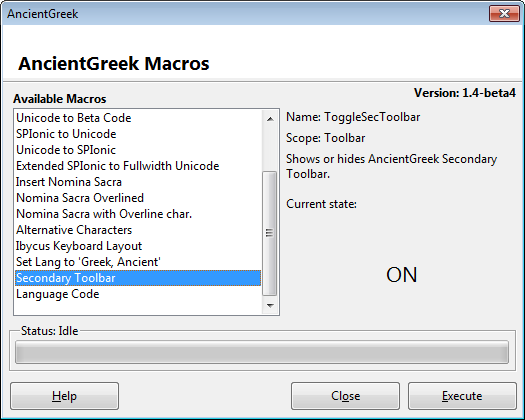
In order to help you unclatter your main toolbar, I provide a macro (called ToggleSecToolbar) through the AncientGreek dialog, shown in the following picture.

Showing / hiding the Secondary Toolbar (Windows 7)
Selecting Secondary Toolbar under Available Macros (second to last entry) and pressing ENTER, will toggle the toolbar's visibility.
OpenOffice 4.0.1 seems to handle toolbars in a different way. The toolbar does not even appear under the View / Toolbars menu, and as a result this macro does not work. Furthermore, there is no way to make Secondary Toolbar visible after it has been hidden or closed.
In OpenOffice 4.1 things are better; the toolbar does go on and off, but if you open a new document after turning the toolbar off, you won't be able to make it appear, even though the dialog reports it's on. Then, if you open a new document, the toolbar will be visible again...
OpenOffice 4.1.2, on the other hand, seems to behave as expected (tested on Windows 8 and Mac OS X).
First Run^
After installing (or updating) AncientGreek you have to restart LibreOffice / OpenOffice. When you get back to it, there are a couple of things you have to do in order to get to a "normal" working environment.
Depending on your Operating System, you have to proceed as follows.
• On Windows
On Windows you will see something like the following
As you can see the Secondary Toolbar is floating above the main toolbar and is named "Add-On 3". The name may be localized (if your installation is localized) and the number may differ also.
All you have to do is dock the Secondary Toolbar on the main toolbar and you are done.
• On Linux
On a Linux system you will see something like the following
The toolbar is again floating but now its name is "Add-On 4". The interesting thing here is that instead of icons, the toolbar is filled with text (actually the icons hint text).
All you have to do is dock the Secondary Toolbar on the main toolbar and restart again LibreOffice / OpenOffice. When it's back up and running the icons will be there.
Uninstalling AncientGreek^
AncientGreek has performed several customizations to OpenOffice/LibreOffice during its installation and function. In order to completely uninstall it, these customizations have to be undone.
This can be achieved using the "Uninstall Preparation" menu entry. When clicked, a confirmation dialog will be presented to the user:

The Uninstall confirmation dialog on Mac OS
When "Yes" is clicked, all AncientGreek customization is undone and when finished, a relevant message is displayed:

Direct access to the Macros^
This section will be useful to you in case you want further direct access to one of AncientGreek macros, by:
- Assigning keyboard shortcut for them (page: Shortcuts)
- Making them appear on a toolbar (page: Toolbar).
- Making them appear in a menu (page: Menu). As of v. 1.3-beta7 a menu named AncientGreek exists in the main menubar, so this step is not necessary any more. The page is left on-line just for reference.
The following table shows the macros a user can safely execute, insert in menus and toolbars and assign keyboard shortcuts for.
The easiest way to access the icons would be to open an offline help page (open AncientGreek Main Window and click on the Help button), and use the browser's location address to navigate to folder AncientGreek.
For example, if the browser's location address was "file:///C:/Users/spiros/AppData/
Roaming/LibreOffice/4/user/uno_packages/cacheuno_packages/lunti5.tmp_/
AncientGreek-1.6-beta10.oxt/help/doc/macros.html", you would find the icons in
"C:/Users/spiros/AppData/Roaming/LibreOffice/4/user/uno_packages/cache/
uno_packages/lunti5.tmp_/AncientGreek-1.6-beta10.oxt/AncientGreek".
You can use either the 16 or the 26 pixels size icons found in this folder, making sure that whatever you do, you do not remove them from this location.


